Have you ever wanted to move your Virtual PC base and differencing disks to a different locations or to a different system? Well, I recently have. A friend of mine sent me the following blog post (I highly recommend it if you are thinking about using virtual systems), which talks about how to setup virtual systems using differencing disks:
Use VirtualPCs Differencing Disks To Your Advantage
As per this post, I have created the following three virtual disks:
| Virtual Disk | Description |
| base_WinXPsp2.vhd* | This is the base disk that containsthe Windows XP with SP2. |
| diffOnBase_VS2K5.vhd* | This is the diff disk on top ofthe base disk and it has Visual Studio 2005 installed. |
| sandbox1.vhd | This is the final diff disk on top of the VS2K5 diff disk. |
* Reusable virtual disks.
The idea here is to reuse the virtual disks base_WinXPsp2 and diffOnBase_VS2K5 again and again and have different configurations (or sandboxes) built on top of these. You do not want to change these virtual disks and hence you would make them read-only.
As this is the first time I started using the Virtual PCs for my daily work(development), I have not given much thought to how I should organize the files and how I can leverage the base images. I have kept all of these files in the same directory and started using this as my main development machine. If I need another virtual system, I thought, I would simply copy the reusable disks into a new folder and then create new virtual disk on top of that (i.e. sandbox2.vhd, sandbox3.vhd ... sandboxN.vhd so on) and start using it.
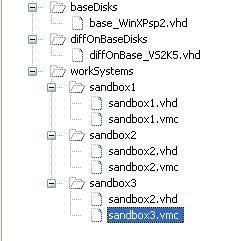
The main reason behind using reusable virtual disks is to save space when you create many virtual systems. Obviously, I am not leveraging that benefit here. So, I have rearranged them as shown below:

After I made sure the base virtual disk file (base_WinXPsp2.vhd) is read only, I used the Virtual Disk wizard and changed the parent virtual disk references. Here are the steps that I have used:
| 1) Make sure base_WinXPsp2.vhd is read only. | |
| 2) Make sure diffOnBase_VS2K5.vhd is not read only since we will be changing the parent virtual disk reference stored inside this file. | |
| 3) Start the Virtual Disk Wizard. |  |
| 4) Select the "Edit an existing virtual disk" option. |  |
| 5) Select the current working image's virtual disk (sandbox1.vhd) and click "Next". |  |
| 6) Change the path to parent virtual disk (i.e. diffOnBase_VS2K5.vhd) of sandbox1.vhd. |  |
| 7) Change the path to parent virtual disk (i.e. base_WinXPsp2.vhd) of diffOnBase_VS2K5.vhd. |  |
| 8) You might get a warning about modifying the parent virtual disks, hit OK on this dialog. |  |
| 9) Finally, you get a dialog about asking you to merge virtual hard disks. Since we are not interested in merging any disks, we just wanted to change the reference paths stored inside the disks, so go ahead and click on the “Cancel” button. This is the key step that is not very obvious that we could skip this part. |  |
Now, go ahead and double click on your virtual system configuration file (i.e. sandbox1.vmc) and it should successfully start the virtual system. You can create more systems (sandboxes) off of the reusable virtual disks as I have done with sandbox2 and sandbox3.
Virtual Cheers,
Sonny :)
No comments:
Post a Comment