Wednesday, April 23, 2008

Extract URLs from Internet Explorer(IE) History cache


The other day I was trying to extract bookmarks from my IE's history cache, but could not find any tools in IE to do that. Looked around on Google and found a VB Project, which is fine, but I am looking for something using C#. Then, I found this article on CodeProject titled The tiny wrapper class for URL history interface in C#, which would work, but I want a simple script that I can tweak and just run from the command prompt. Again, it would be nice if it is in C# as I have been using this C# Script tool for a while and I really love it. It is called The C# Script Engine by Oleg Shilo and I would highly recommend you explore it if you are not already aware of this gem. It is really clean and lean and does not require any special syntax or setup and could simply use a file that was created with Visual Studio. If you want to automate something and want to do it in C#, this is the tool to use. I would have more to write about this tool later.

Back to our original task, searching on the API calls that are referenced in the above articles, I found the following two links (one on MSDN and one on Google's Code project) which looked promising:

HOW TO: Clear the Cache When Your Application Hosts a WebBrowser Control in Visual C# .NET

WinApis.cs file on Google Code project called csexwb2 - The most complete .NET Webbrowser control wrapper

Mostly based on the code given in WinApis.cs, I written a C# Script that can be run using the C# Script Engine mentioned above or can also be run using csc.exe that comes with the .NET Framework. You could also add this to any C# IDE Project file and run it from there. It writes the entries from IE's cache to a text file called "ieHistory.txt".

The code in the above script file is pretty self explanatory, but I would like to mention a few things that might come handy if you like to experiment with or tweak the script more.

On the MSDN page, it declares the lpszSourceUrlName and lpszLocalFileName as IntPtr and I had problem converting these fields to Strings, so I used the struct definition given in csexwb2.

Using the PInvoke declarations on MSDN page, I was not able to get it recognize the urlPattern argument, and I had to use the declarations given in csexwb2.

Hope you find this useful.

Best Wishes,

Sonny
Tuesday, April 15, 2008

Move VirtualPC Base & Differencing Disks

Have you ever wanted to move your Virtual PC base and differencing disks to a different locations or to a different system?  Well, I recently have. A friend of mine sent me the following blog post (I highly recommend it if you are thinking about using virtual systems), which talks about how to setup virtual systems using differencing disks:

Use VirtualPCs Differencing Disks To Your Advantage

As per this post, I have created the following three virtual disks:
Virtual Disk Description
base_WinXPsp2.vhd* This is the base disk that containsthe Windows XP with SP2.
diffOnBase_VS2K5.vhd* This is the diff disk on top ofthe base disk and it has Visual Studio 2005 installed.
sandbox1.vhd This is the final diff disk on top of the VS2K5 diff disk.

* Reusable virtual disks.

The idea here is to reuse the virtual disks base_WinXPsp2 and diffOnBase_VS2K5 again and again and have different configurations (or sandboxes) built on top of these.  You do not want to change these virtual disks and hence you would make them read-only.

As this is the first time I started using the Virtual PCs for my daily work(development), I have not given much thought to how I should organize the files and how I can leverage the base images.  I have kept all of these files in the same directory and started using this as my main development machine.  If I need another virtual system, I thought, I would simply copy the reusable disks into a new folder and then create new virtual disk on top of that (i.e. sandbox2.vhd, sandbox3.vhd ... sandboxN.vhd so on) and start using it.

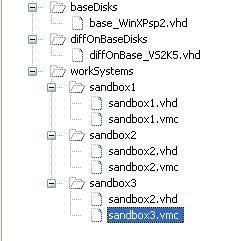
The main reason behind using reusable virtual disks is to save space when you create many virtual systems.  Obviously, I am not leveraging that benefit here. So, I have rearranged them as shown below:


After I made sure the base virtual disk file (base_WinXPsp2.vhd) is read only, I used the Virtual Disk wizard and changed the parent virtual disk references. Here are the steps that I have used:
1) Make sure base_WinXPsp2.vhd is read only.  
2) Make sure diffOnBase_VS2K5.vhd is not read only since we will be changing the parent virtual disk reference stored inside this file.  
3) Start the Virtual Disk Wizard.
4) Select the "Edit an existing virtual disk" option.
5) Select the current working image's virtual disk (sandbox1.vhd) and click "Next".
6) Change the path to parent virtual disk (i.e. diffOnBase_VS2K5.vhd) of sandbox1.vhd.
7) Change the path to parent virtual disk (i.e. base_WinXPsp2.vhd) of diffOnBase_VS2K5.vhd.
8) You might get a warning about modifying the parent virtual disks, hit OK on this dialog.
9) Finally, you get a dialog about asking you to merge virtual hard disks.  Since we are not interested in merging any disks, we just wanted to change the reference paths stored inside the disks, so go ahead and click on the “Cancel” button. 
This is the key step that is not very obvious that we could skip this part.

Now, go ahead and double click on your virtual system configuration file (i.e. sandbox1.vmc) and it should successfully start the virtual system.  You can create more systems (sandboxes) off of the reusable virtual disks as I have done with sandbox2 and sandbox3.

Virtual Cheers,

Sonny :)

Friday, April 11, 2008

Snapshot of active window in Virtual PC

Lately, I have been doing most of my work using a Virtual PC and I often find myself having to take a snapshot of the active window (dialog box), especially to create all my blog entries.

I know that Alt+Print Screen copies the snapshot of the active window to the clip board, but in Virtual PC environment RightAlt key acts as the Host key, so if you use the RightAlt key it would not work. So make sure you always use the LeftAlt key to take a snapshot of the active window in Virtual PC environment.

hostname works but localhost and local loop back address do not work in IE

I recently ran into a strange issue and spent about a day troubleshooting this so I thought I share my findings here.

I had a classic ASP webapp running on a virtual system and I could access it using http://localhost/webapp/ or http://127.0.0.1/webapp URLs. No problem, until I made the following changes:

  1. Added the virtual system to our domain to be able to access some apps

  2. Moved the virtual system files to an external HDD

I could no longer access the app using either one of above URLs. When I tried to access the app or even an image file off of this web app using http://localhost/webapp/, I get a "DNS Fail" error message as shown below:


And if I tried to access the app using http://127.0.0.1/webapp, I get a "Access Denied" error message as shown below:

I am not sure which one of these is caused this issue or if the above changes are even the culprits.

I tried the usual stuff (not necessarily in the order listed below) like the following:

  1. Checked my C:\WINDOWS\SYSTEM32\drivers\etc\hosts file and made sure local loop back address is mapped to localhost.

  2. Pinged the localhost to make sure it is getting resolved correctly.

  3. Checked the IIS configuration to make sure the "IP Address" is set to "All Unassigned" in the "Web Site" tab:


  4. I have checked the permissions on the folder mapped to the Home Directory.

  5. I have un-installed and re-installed IIS.

  6. Followed the steps given in the Microsoft KB Article ID: 271071 (How to set required NTFS permissions and user rights for an IIS 5.0 Web server). CAUTION: This process took a long time to complete.


After trying few other things that I could not quite recall all the details, I wondered if I should access the webapp using the hostname, i.e. http://myhost/webapp and bingo! it worked. I am still not sure why hostname works and the other two don't. I searched using Google and I did not find any similar issues, so I do not know what is causing it.

I gave up for the day and decided to leave it like that. The next day, I wanted to give it another try since it was really bothering me.

I decided to use the telnet command to fetch the starting page using all three URLs and lo and behold all of them retrieved the right content. So, there is nothing in the IIS that is causing this, so some setting in Internet Explorer (IE) must be causing it. I tweaked a few settings in IE and they did not fix the problem. Then I found the reset all button.

I reset all the IE settings and restarted IE and now I could access my app using all three URLs.

So, I still do not know what caused this strange issue, but am happy that it is fixed now. I guess, if it happens again I know what to try and where to look.

Hope you find this useful.

Sonny